IntelliJ Plugin
DeepScan provides a plugin which enables you to see bugs and quality issues on the fly in your IntelliJ and WebStorm.
Overview
DeepScan's plugin for IntelliJ helps you to see bugs and quality issues on the fly in your IntelliJ and WebStorm. Once you enable it for the project, the builder is added and analyzes the project.
- Report issues in the editor on the fly (on typing).
- Integrate with Inspection Results view for the whole project.
- Highlight issues in the code.
- Easy rule settings.

Requirements
Operating System
- Windows
- Linux
IDE
- IntelliJ IDEA 2020.3 or above
- WebStorm
Java
- Oracle JRE 11 or above
- OpenJDK 11 or above
- Windows
- Linux
- IntelliJ IDEA 2020.3 or above
- WebStorm
Java
- Oracle JRE 11 or above
- OpenJDK 11 or above
- Oracle JRE 11 or above
- OpenJDK 11 or above
Installation
Installing the plugin
In File > Settings > Plugins settings, click Install Plugin from Disk... menu and select the DeepScan plugin (*.jar or *.zip).
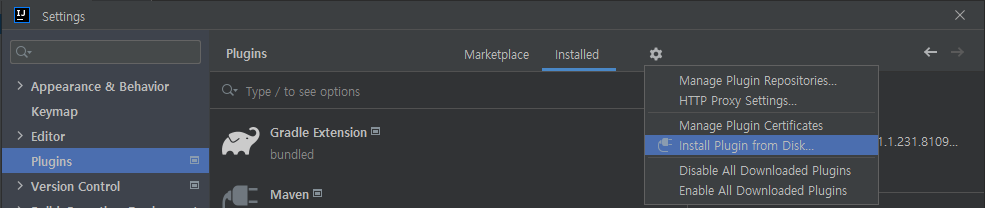
The plugin will be installed after restarting the IDE. You can see the installed plugin in Plugins.
Registering the license
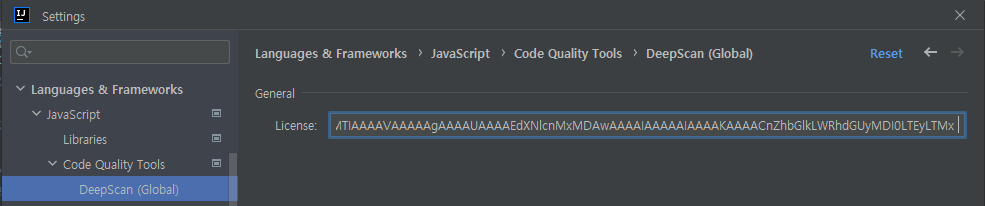
A license key is required to run the IntelliJ DeepScan plugin. If a valid license key is not registered, license errors will occur when executing the analysis.
In File > Settings > Language & Frameworks > JavaScript > Code Quality Tools > DeepScan (Global) settings, enter and save the license key in the License field.
Upgrading
With an upgraded plugin file, follow the same process as installing.
Uninstalling
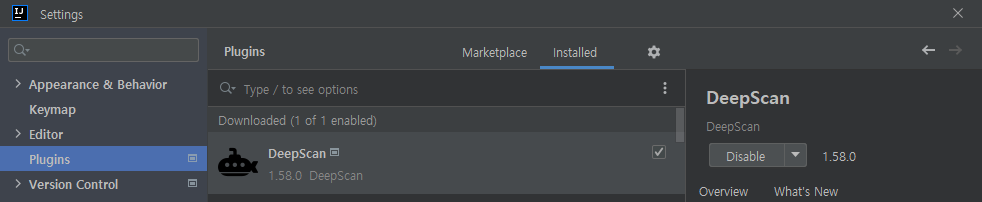
In File > Settings > Plugins settings, select the DeepScan plugin. Then, press Delete key or select Uninstall menu from the pop-up menu.
The plugin will be uninstalled after restarting the IDE.
Analysis
Analyzing a project
DeepScan plugin works based on IntelliJ's Code Inspection.
It supports both the local and global inspection, so you can instantly analyze your code as you type and even analyze your entire project.
- Analyzing an entire project: When you click Code (or Analyze) > Inspect Code... menu
- Analyzing a file on-the-fly: When you type in the editor
Analysis Target
For detailed information about the analysis target, refer to the following:
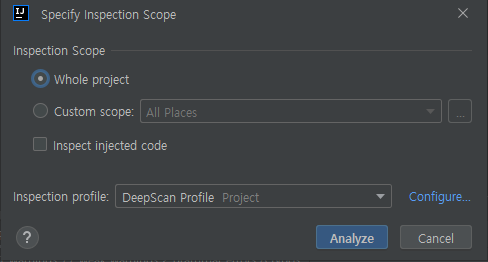
Inspect Project
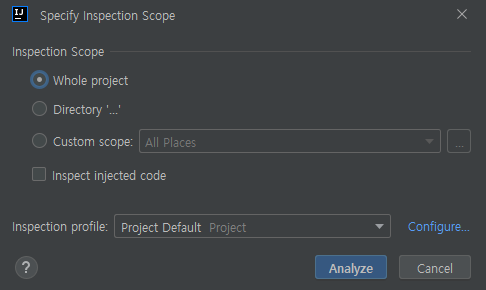
You can also analyze a whole project rather than a file on-the-fly.
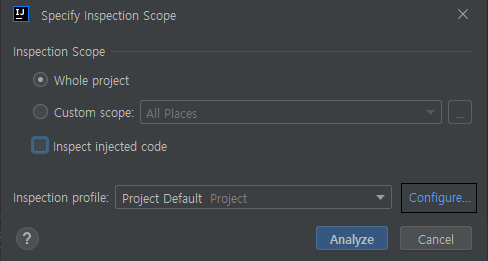
- Click Code (or Analyze) > Inspect Code... menu.
- Select the Inspection scope and click Analyze button.
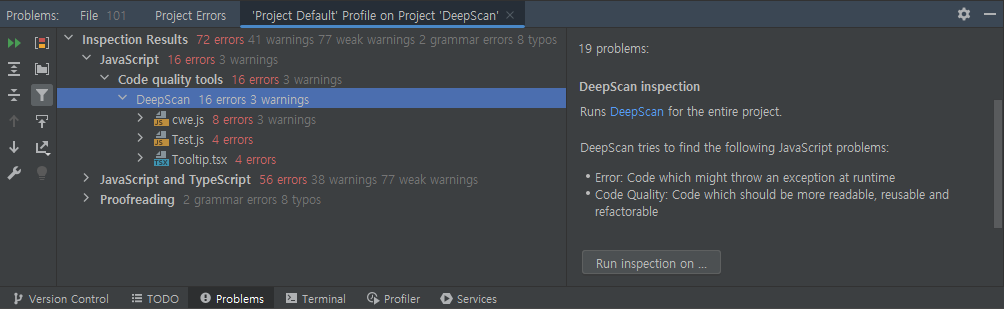
- You can see the analysis results in JavaScript > Code Quality Tools > DeepScan under Inspection Results view.
Running DeepScan only
As of Code Inspection, other inspection tools are also executed, so that the analysis can take a long time. If you want to run DeepScan only, you can create a separate inspection profile for it.
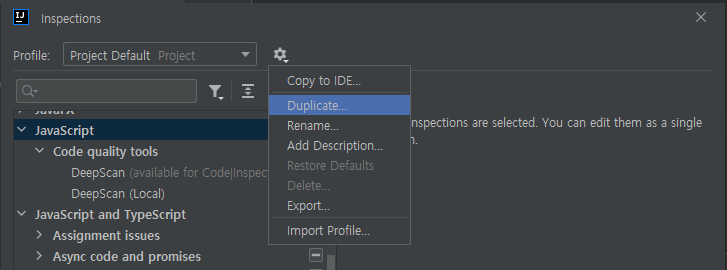
- Click Configure... button in Inspection profile.
- Click Duplicate... menu to create a new profile cloning the current profile, and enter a name.
- Click Reset to Empty button to disable all inspection tools.
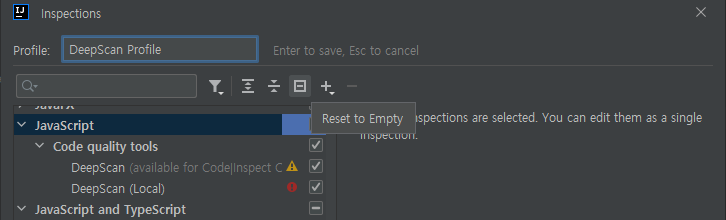
- Only check the DeepScan inspection (you can filter by typing
deepscan) and click OK button.
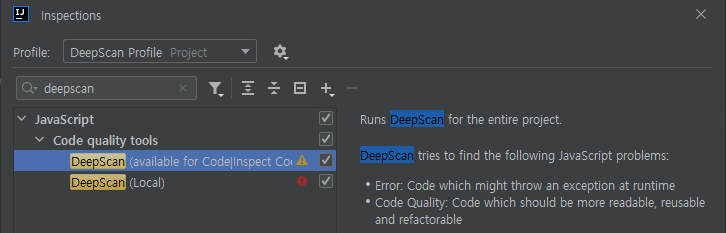
- Inspect a project with this new profile.
Settings
DeepScan for IntelliJ provides project-specific settings in File > Settings > Language & Frameworks > JavaScript > Code Quality Tools > DeepScan.
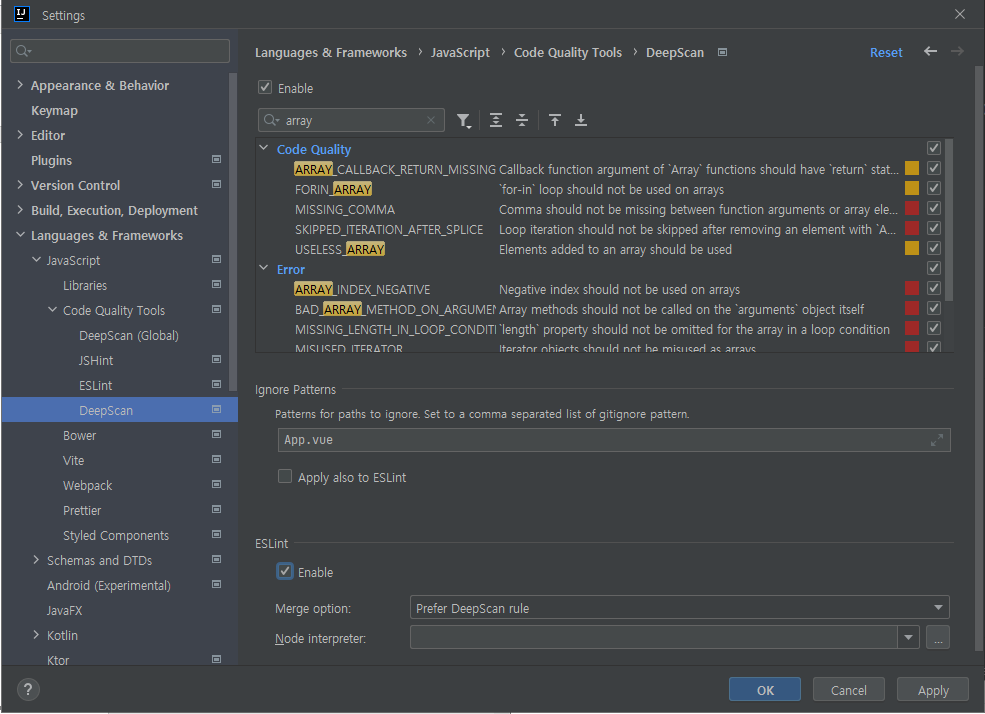
Enable
Enable or disable DeepScan inspection for the project.
Ignore Rules
You can choose the rules to exclude for the analysis in the project settings.
Find the rules to exclude, uncheck those, and click OK button. Afterwards, the analysis will ignore the rules.
Export and Import Rules
In the toolbar menu  under the rule settings, you can export the rule set in use and import it from a file.
By sharing the exported file, you can share your own rule set with other people.
- Export: Click Export Rules button and specify a directory to export the file. Currently selected rule set is saved as a
DeepScan_rules.jsonfile. - Import: Click Import Rules button and select the exported file (
*.json). Rule set in a file is applied.
Ignore Patterns
You can specify patterns of files/directories to exclude in the project settings.
It is a comma-separated paths, and each pattern follows the gitignore format. Below are some examples:
| Pattern example | Description |
|---|---|
test.js |
test.js files in all directories are ignored. |
*port.js |
All files ending in port.js, such as import.js and export.js, are ignored. |
test/ |
All test directories are ignored. |
/WebContent/ |
WebContent directory located at the project root is ignored. |
After the patterns is set, the files or directories will be ignored when inspecting the project.
You can apply these ignore patterns also for ESLint by selecting Apply also to ESLint checkbox.
Running ESLint
You can see the ESLint alarms together with DeepScan's issues by running ESLint configured in your project.
To enable this feature, check ESLint > Enable in the project settings.
- ESLint package is required in the local or global.
NODE_PATHenvironment variable is necessary to load the ESLint module installed in global. - ESLint configuration files (
.eslintrc.jsonfiles) located in your project are directly used and you can use custom plugins as is. - You can choose how identical issues of DeepScan and ESLint are merged. In Merge option, choose one of the following:
- Prefer DeepScan rule: Show only DeepScan issues (default)
- Prefer ESLint rule: Show only ESLint issues
- Do not merge: Show all issues as is
- Node.js is required to run ESLint package. Specify Node.js executable path in Node interpreter option when you don't have it in the
PATH.
Other Convenient Functions
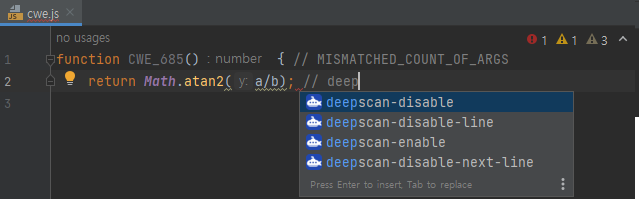
Disabling Rules with Inline Comments
While you can exclude project-wide rules via Settings, you can also disable a rule in a file using the following inline comments:
| Inline comment | Description |
|---|---|
deepscan-disable |
Disable rules from the position |
deepscan-enable |
Enable rules from the position |
deepscan-disable-line |
Disable rules in the current line |
deepscan-disable-next-line |
Disable rules in the next line |
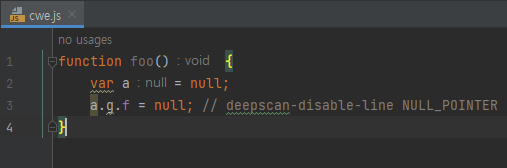
Below is an example of disabling all rules for a line via deepscan-disable-line comment.

For detailed information, refer to Disabling rules.
You can enter inline comments more conveniently through code completion.
When you type an inline comment and press Ctrl + Space key, DeepScan suggests the suppress comments. When you select one, it is automatically entered.
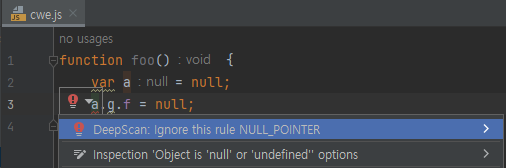
You can also enter inline comments through Quick Fix for DeepScan issues.
When you press Alt + Enter key in DeepScan issues, some quick fixes are suggested. Select Ignore this rule <rule>, then the inline comment disabling the rule is automatically entered.
Auto Fix (Experimental)
DeepScan has a long roadmap to provide an auto fix feature, which automatically modifies the non-compliant code into compliant one.
As an experiment, the plugin provides a simple auto fix for the two rules:
| Rule | Fix Action |
|---|---|
| ASSIGN_SAME_VALUE | Remove the assignment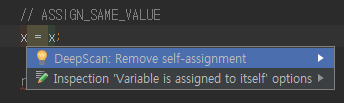 |
| BAD_ASSIGN_TO_CONST | Change const to var / Remove the assignment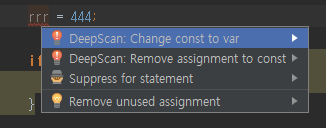 |