Visual Studio Code Extension
DeepScan provides a Visual Studio Code extension enabling on-the-fly analysis for JavaScript and TypeScript in development.
Overview
DeepScan's extension for Visual Studio Code helps you to see bugs and quality issues on the fly in your Visual Studio Code.
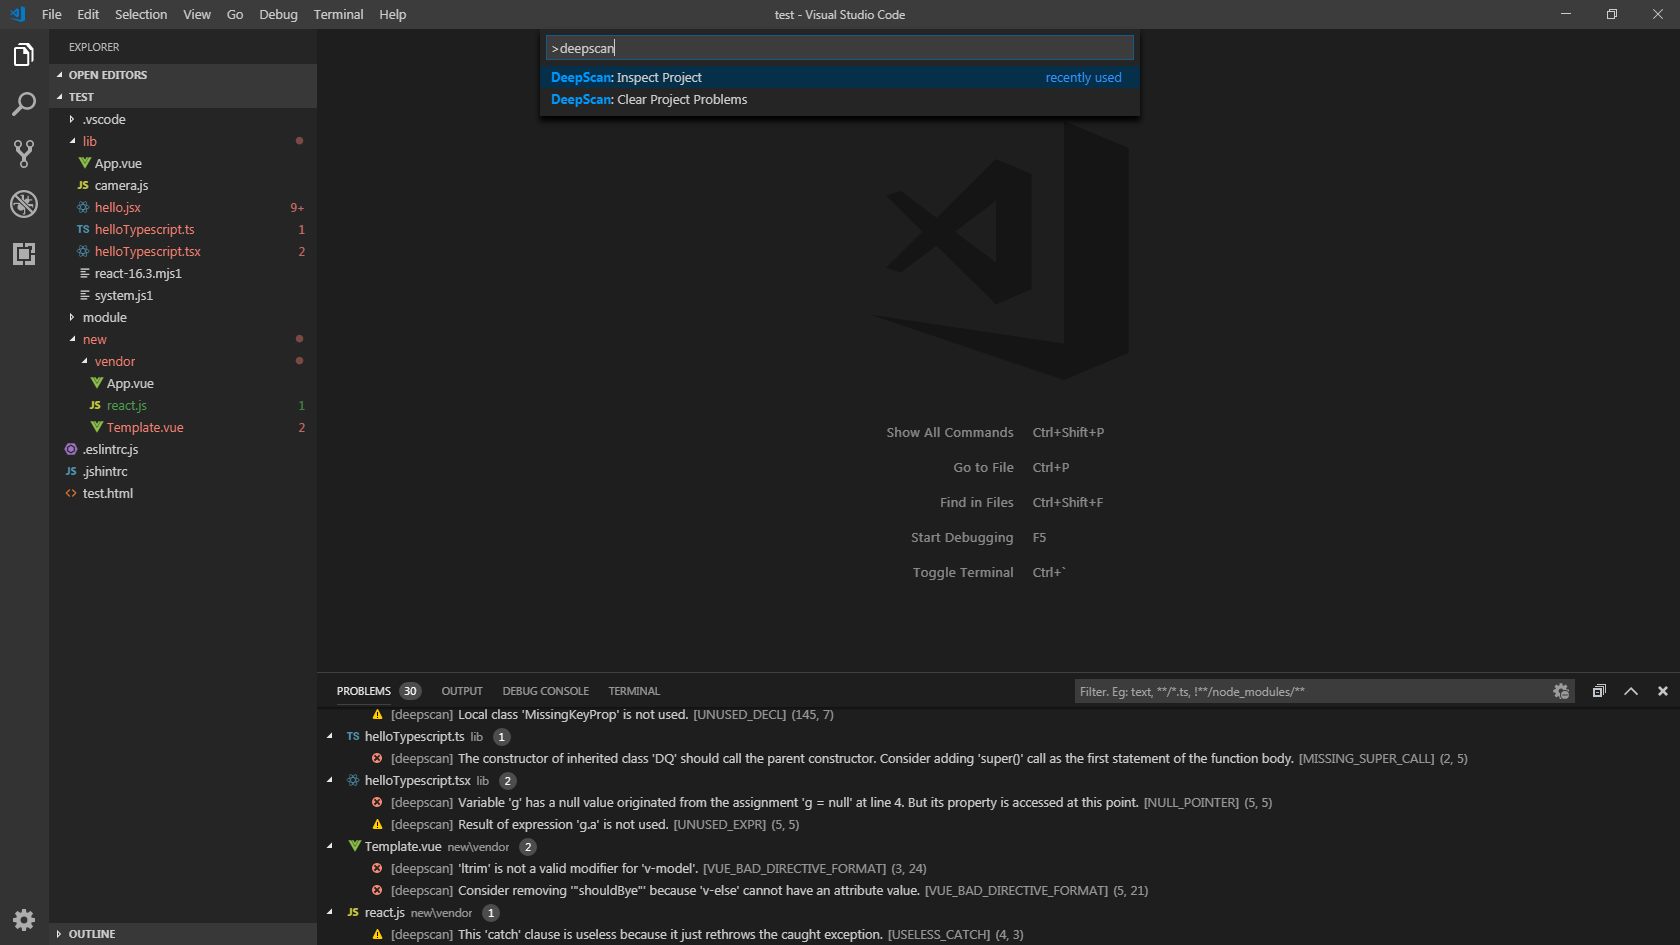
- Report issues in Problems panel when you open or save a JavaScript/TypeScript file and save it. Supported extensions are
*.js,*.jsx,*.mjs,*.ts,*.tsx, and*.vue. - Highlight issues in the code.
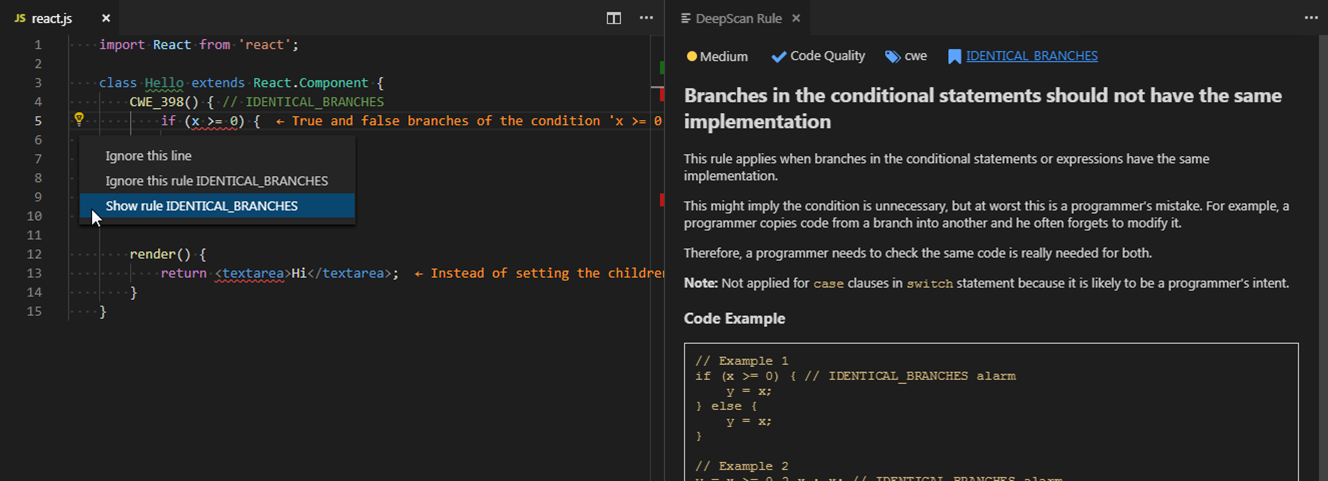
- Show a rule description using a code action. When you click the light bulb of the issue, you can see the detailed description of the rule and grasp what's the problem.
You can browse it in the Visual Studio Code Marketplace and install from within Visual Studio Code.

Embedded Server Configuration
Instead of sending your code to the DeepScan server for inspection, an embedded analysis server is provided in the Enterprise package. It works with the local language server so you can:
- never worry about transferring the code outside.
- analyze a whole project rather than a file.
System Requirements
To run the embedded server, Java is required.
- Oracle JRE 8 or above
- OpenJDK 8 or above
The path to a Java executable must be set in PATH environment variable. Otherwise, you will not be able to run the server. (resulting an error such as Cannot start the DeepScan server.)
Also, the DeepScan extension 1.7.0 or above is required for the embedded mode. (The latest is recommended, so either set up to auto-update or check whether there is the latest update before setting up this.)
Installation
To run as the embedded configuration, the following settings are required:
- Server Embedded: Enable: Controls whether DeepScan inspection should be executed via the embedded server rather than DeepScan server. (Restart required)
- Server Embedded: License: Configures the license for the embedded analysis.
- Server Embedded: Server Jar: Configures the JAR file for the embedded server. (Restart required)

To install, complete the above settings and restart VS Code.
To upgrade, change deepscan.serverEmbedded.serverJar to the path of a newer JAR file and restart VS Code.
Options
You can configure options (enablement, server, ignored rules, ...) through user and workspace settings.
To see all the available options, refer to Settings Options.
Features
Inspect Project
You can analyze a whole project by clicking DeepScan: Inspect Project in the command palette. The entire project is analyzed and the detected issues are displayed in Problems view.

You can specify patterns of files to exclude by deepscan.ignorePatterns option (gitignore format). An example to exclude App.vue file and lib directory is:
{
    "deepscan.ignorePatterns": [
        "App.vue",
        "lib/"
    ]
}
Disabling Rules with Inline Comments
While you can exclude project-wide rules via deepscan.ignoreRules option, you can also disable a rule in a file using inline comment.
const x = 0;
x = 1; x + 1; // deepscan-disable-line UNUSED_EXPR
By Ignore this line and Ignore this rule code actions, you can add an inline comment easier.
For detailed information, refer to Disabling rules.
Viewing Rule Information
For a detected issue, you can view the corresponding rule information such as severity, description, non-compliant and compliant examples.
When you click Show rule <rule name> code action menu in the line where the issue is detected, you can view the detailed information of the rule on the right side.

ESLint Analysis
Run ESLint. You can see the ESLint alarms altogether with DeepScan's issues.
Node.js and eslint package are required in the local or global. Note that NODE_PATH environment variable is necessary to load the eslint module installed in global.
It directly uses the package so your custom configurations and plugins are applied as is.
The options are as follows:
- Server Embedded > Eslint: Enable: Controls whether ESLint analysis should be executed.
- Server Embedded > Eslint: Merge: Option for how identical issues of DeepScan and ESLint are merged. Default is
deepscan.deepscan: Show only DeepScan issue (e.g.,BAD_TYPEOF_COMPARISON). Default.eslint: Show only ESLint issue (e.g.,valid-type-of)both: Show all issues as is (e.g.,BAD_TYPEOF_COMPARISONandvalid-type-of)
